
MVC Composition
In this post i’ll try to explain my point of view on an old architecture pattern: Model View Controller.
All iOS developers know MVC. All iOS developers also know why it’s called “Massive View Controllers”.
I’ll try to explain some of the techniques i use to write simple reusable ViewControllers and how i use composition to assemble them as screens of the app.
MVC is promoted by Apple. All Sample code from Apple is using MVC. UIKit is written using MVC in mind. So why not use MVC in your Application?
When people learn development on iOS they look at Apple Sample Code. Sample code really is juste sample code. It’s about making small easily understandable code. So it’s not always very clean in terms of architecture.
Also, not so long ago Apple documentation used to say that a View Controller = a screen of the application. While this could be true for very simple screens, applications nowadays usually display a lot of information, with a lot of possible interactions. If you try to pack all the features for a screen in a single ViewController you end up with a “Massive View Controller”.
So what is the solution?
The solution is to admit that a ViewController is really just the Controller for a View of the application, not a complete screen. And a screen is Composed of a multitude of views. This means that the code for a screen of your application must be Composed of multiple ViewControllers
Composition is essential in modern MVC. So how do you compose ViewControllers? Just use Apple UIKit API available since iOS 5:
1
2
3
4
5
6
7
8
	/*
	  If the child controller has a different parent controller, it will first be removed from its current parent
	  by calling removeFromParentViewController. If this method is overridden then the super implementation must
	  be called.
	*/
	@available(iOS 5.0, *)
	open func addChild(_ childController: UIViewController)
This api allows you to build a hierarchy of ViewControllers the way you build a hierarchy of views.
To use it, do the following:
1
2
3
4
5
6
7
8
9
10
11
12
13

	// Notify Child View Controller before
	viewController.willMove(toParent: self)

	// Add Child View as Subview
	someView.addSubview(viewController.view)

	// Add Child View Controller
	addChild(viewController)

	// Notify Child View Controller after
	viewController.didMove(toParent: self)
The order is important here (adding the view as a subview before adding the view Controller).
Maintaining the ViewController hierarchy is important to make sure ViewController lifecycle is correctly called throughout the application.
Let’s study an sample App to see how we can use MVC Composition to make View Controllers less massive and with fewer responsibilities.
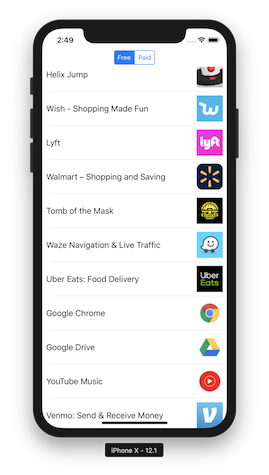
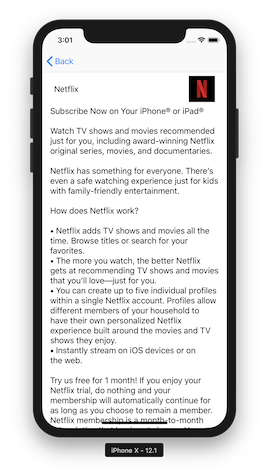
Here are the main and detail screen for the App:
 ……….
………. 
The app just fetches the top 100 apps on the App Store in the Free and Paid categories. App Store Ranks is used as a backend URL:
https://itunes.apple.com/us/rss/toppaidapplications/limit=100/json
When you click on the segmented control you switch category and display the new list (Paid or Free).
When you try to build such an application, you would typically have 2 View Controllers, one for the List and one for the Detail.
By using View Controller composition, we have more view Controllers with less responsibilities.
For exemple, just for the main screen, we use 4 View Controllers.
- ListViewController -> Responsible with displaying apps in a TableView
- AppViewCoordinator -> Responsible for fetching the data that will be displayed by the ListViewController
- SegmentedViewController -> Responsible for managing the segmented control and displaying the appropriate ViewController.
- RootAppsCoordinator -> Main screen responsible for Routing, navigation and configuration.
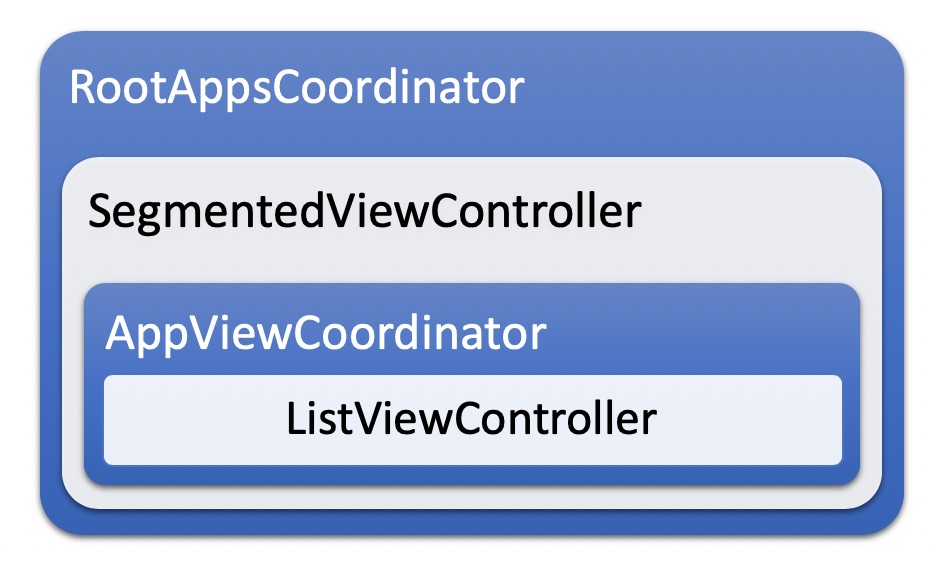
The RootAppsCoordinator embeds the SegmentedViewController which embeds the AppViewCoordinator which embeds the ListViewController.
All these inherit from UIViewController. However some are called Coordinators. Why?
Coordinator name is borrowed from Soroush Khanlou http://khanlou.com/2015/10/coordinators-redux/. However, Coordinators in our example are also ViewControllers. They do not display or format Data, but they are responsible for Routing, navigation or fetching data. To read about some interesting ideas of why Coordinators could or should be ViewControllers, you can read the following articles by Dave DeLong:
https://davedelong.com/blog/2017/11/06/a-better-mvc-part-1-the-problems/
On the other hand we have the other View Controllers (ListViewController and SegmentedViewController), who are just responsible for displaying data (glue code between Model and View).
“Simple” ViewControllers should be highly reusable. Coordinators not so much.
Let’s see an example of the ListViewController code:
1
2
3
4
5
6
7
8
9
10
11
12
13
14
15
16
17
18
19
20
21
22
23
24
25
26
27
28
29
30
31
32
33
34
35
36
37
38
39
40
41
42
43
44
45
46
	import UIKit

	public protocol Listable {
	    var text: String { get }
	    var longText: String { get }
	    var imageUrl: String { get }
	}

	class ListViewController: UITableViewController {

	    // MARK: - Variables

	    public var list = [Listable]() {
	        didSet {
	            tableView.reloadData()
	        }
	    }

	    // MARK: - Lifecycle

	    override func viewDidLoad() {
	        super.viewDidLoad()

	        tableView.rowHeight = UITableView.automaticDimension
	        tableView.register(ImageAndTextTableViewCell.self, forCellReuseIdentifier: ImageAndTextTableViewCell.defaultReuseIdentifier)
	    }

	    // MARK: - UITableViewDataSource

	    override func tableView(_: UITableView, numberOfRowsInSection _: Int) -> Int {
	        return list.count
	    }

	    override func tableView(_ tableView: UITableView, cellForRowAt indexPath: IndexPath) -> UITableViewCell {
	        let cell = tableView.dequeueReusableCell(withIdentifier: ImageAndTextTableViewCell.defaultReuseIdentifier, for: indexPath)

	        let element = list[indexPath.row]

	        if let imageCell = cell as? ImageAndTextTableViewCell {
	            imageCell.layout.label.text = element.text
	            imageCell.layout.rightImageView.url = URL(string:element.imageUrl)
	        }

	        return cell
	    }
	}
To decouple even more our ListViewController and make it even more reusable we created a Listable protocol. This protocol contains the elements the ViewController needs to display it’s views. This way we can display any Model in our app using the same ViewController as long as it conforms to Listable protocol:
1
2
3
4
5
6
7
8
9
10
11
12
13
	extension App: Listable {
	    public var text: String {
	        return name
	    }

	    public var longText: String {
	        return summary
	    }

	    public var imageUrl: String {
	        return thumbImageUrl
	    }
	}
Data is passed to the view controller as an array of Listable. We simply react to changes in data by using didSet syntax to reload our TableView.
1
2
3
4
5
	public var list = [Listable]() {
	        didSet {
	            tableView.reloadData()
	        }
	    }
Since the ListViewController just waits for data, who’s responsibility is it to provide it?
For that we use our AppsViewCoordinator:
1
2
3
4
5
6
7
8
9
10
11
12
13
14
15
16
17
18
19
20
21
22
23
24
25
26
27
28
29
30
31
32
33
34
35
36
37
38
39
40
41
42
43
44
45
46
47
48
49
50
51
	import UIKit

	public class AppsViewCoordinator: UIViewController, UITableViewDelegate {
	    // MARK: - Public Variables

	    public var appType: AppType = .free {
	        didSet {
	            title = appType.rawValue
	        }
	    }

	    // MARK: - Private Variables

	    private let appsViewController = ListViewController()

	    private var apps = [App]()

	    // MARK: - Lifecycle

	    public override func viewDidLoad() {
	        super.viewDidLoad()

	        title = appType.rawValue
	        appsViewController.tableView.delegate = self

	        add(asChildViewController: appsViewController)
	    }

	    public override func viewWillAppear(_ animated: Bool) {
	        super.viewWillAppear(animated)

	        let ressource = AppStoreRessource()

	        ressource.getApps(top: 100, appType: appType) { apps, _ in
	            //
	            self.apps = apps
	            self.appsViewController.list = apps
	        }
	    }

	    // MARK: - UITableViewDelegate

	    public func tableView(_: UITableView, didSelectRowAt indexPath: IndexPath) {
	        let detailViewController = DetailViewController()

	        let detail = apps[indexPath.row]

	        detailViewController.detail = detail
	        navigationController?.pushViewController(detailViewController, animated: true)
	    }
	}
This coordinator has 2 responsibilities, fetching the data to display in the ListViewController and navigation (by being the delegate for the ListViewController tableView).
Embedding the ListViewController is done with this line:
1
	add(asChildViewController: appsViewController)
which uses the UIViewController+Container extension:
1
2
3
4
5
6
7
8
9
10
11
12
13
14
15
16
17
18
19
20
21
22
23
	/// Embeds a view controller and also adds it's view in the view hierarchay
    ///
    /// - Parameter viewController: ViewController to add
    public func add(asChildViewController viewController: UIViewController, anchored: Bool = true, subview: UIView? = nil) {
        let someView: UIView = subview ?? view

        // Notify Child View Controller before
        viewController.willMove(toParent: self)

        // Add Child View as Subview
        someView.addSubview(viewController.view)

        // Add Child View Controller
        addChild(viewController)

        if anchored {
            // Embeded viewControllers should not use safeAnchors
            someView.anchor(view: viewController.view, useSafeAnchors: false)
        }

        // Notify Child View Controller after
        viewController.didMove(toParent: self)
    }
We are still missing the segmented control at the top of the screen.
There are multipe ways to do this but we used a Reusable SegmentedViewController approach.
We created the SegmentedViewController as a container controller. This container (like UINavigationController or UIPageViewController are container Controllers), takes an array of ViewControllers as an input. It’s responsiblity is to layout the segmented control above the content, and also to switch between the View Controllers when the user touches a segment.
Again this ViewController is highly reusable and can be used to display any view controllers throughout the application.
1
2
3
4
5
6
7
8
9
10
11
12
13
14
15
16
17
18
19
20
21
22
23
24
25
26
27
28
29
30
31
32
33
34
35
36
37
38
39
40
41
42
43
44
45
46
47
48
49
50
51
52
53
54
55
56
57
58
59
60
61
62
63
64
65
66
67
68
69
70
71
72
73
74
75
76
	public class SegmentedViewController: UIViewController {

	    // MARK: - Public variables

	    /// List of ViewControllers. View Controller Titles are used as segment titles.
	    public var items = [UIViewController]() {
	        didSet {
	            // Remove previous viewControllers
	            for previousItem in oldValue {
	                self.remove(viewControllerToRemove: previousItem)
	            }
	            // Remove segments
	            segmentedControl.removeAllSegments()

	            // Add new segments and first viewController
	            for (index, item) in items.enumerated() {
	                segmentedControl.insertSegment(withTitle: item.title, at: index, animated: false)

	                if index == 0 {
	                    segmentedControl.selectedSegmentIndex = 0
	                    selectController(at: index)
	                }
	            }
	        }
	    }

	    // MARK: - Private variables

	    private let segmentedControl = UISegmentedControl()
	    private let containerView = UIView()
	    private let stackView = UIStackView()
	    private let topStackView = UIStackView()

	    // MARK: - LifeCycle

	    public override func viewDidLoad() {
	        super.viewDidLoad()

	        topStackView.axis = .vertical
	        topStackView.alignment = .center
	        topStackView.distribution = .equalSpacing
	        topStackView.isLayoutMarginsRelativeArrangement = true
	        topStackView.preservesSuperviewLayoutMargins = true

	        view.backgroundColor = .white
	        stackView.axis = .vertical
	        stackView.distribution = .fill
	        stackView.alignment = .fill

	        view.addSubview(stackView)
	        view.anchor(view: stackView, useSafeAnchors: false)

	        stackView.addArrangedSubview(topStackView)
	        topStackView.addArrangedSubview(segmentedControl)
	        stackView.addArrangedSubview(containerView)

	        segmentedControl.addTarget(self, action: #selector(segmentDidChange(segment:)), for: .valueChanged)
	    }

	    // MARK: - Actions

	    @objc
	    private func segmentDidChange(segment: UISegmentedControl) {

	        selectController(at: segment.selectedSegmentIndex)

	        print(segment.selectedSegmentIndex)
	    }

	    private func selectController(at index: Int ) {

	        let item = items[index]

	        add(asChildViewController: item, anchored: true, subview: containerView)
	    }
	}
Here you can see the layout is done using StackViews. When i can i rather not use Interface Builder. I find it much cleaner to write evertyhing programatically. I found stackviews a convenient way to use Auto Layout without writing any constraints by hand.
Also i do what i call “Playgrounds Driven Development”, in which i use Xcode Playgrounds to prototype every screens of my App. But this needs a post of it’s own and i will write one later about this.
The final block is the RootAppsCoordinator:
1
2
3
4
5
6
7
8
9
10
11
12
13
14
15
16
17
18
19
20
21
22
23
24
25
26
27
28
29
30
31
	public class RootAppsCoordinator: UIViewController, UINavigationControllerDelegate {
	    // MARK: - Private variables

	    private let segmentedViewController = SegmentedViewController()
	    private let freeAppsViewCoordinator = AppsViewCoordinator()
	    private let paidAppsViewCoordinator = AppsViewCoordinator()
	    private lazy var navController = UINavigationController(rootViewController: segmentedViewController)

	    // MARK: - Lifecycle

	    public override func viewDidLoad() {
	        super.viewDidLoad()

	        navController.delegate = self

	        freeAppsViewCoordinator.appType = .free
	        paidAppsViewCoordinator.appType = .paid

	        add(asChildViewController: navController)

	        segmentedViewController.items = [freeAppsViewCoordinator, paidAppsViewCoordinator]
	    }

	    // MARK: - UINavigationControllerDelegate

	    public func navigationController(_ navigationController: UINavigationController, willShow viewController: UIViewController, animated: Bool) {
	        // Allows hiding the navigation bar for the rootViewController
	        let hide = viewController == navigationController.viewControllers.first
	        navigationController.setNavigationBarHidden(hide, animated: animated)
	    }
	}
This Coordinator configures the ViewControllers needed by the SegmentedViewController. It is also the delegate for the NavigationController to hide the Navigation bar on the first ViewController.
This coordinator is displayed as the main controller for the application in the app delegate:
1
2
3
4
5
6
7
8
9
10
11
12
13
14
	class AppDelegate: UIResponder, UIApplicationDelegate {
	    var window: UIWindow?

	    func application(_: UIApplication, didFinishLaunchingWithOptions _: [UIApplication.LaunchOptionsKey: Any]?) -> Bool {
	        window = UIWindow(frame: UIScreen.main.bounds)

	        let viewController = RootAppsCoordinator()

	        window?.rootViewController = viewController
	        window?.makeKeyAndVisible()

	        return true
	    }
	}
All the code above can be found in the following repository:
https://github.com/NGRP/Swift-Playgrounds-iOS.git
To summarize, i think that composing screens using multiple View Controllers can fix a lots of the issues of MVC architecture. Yes we have a lot more ViewControllers, but they have less responsibilities and the code is more concise and clear. Also you will find out that you will start reusing a lot more code by using this architecture.